
Internet access for some Graduate accommodation is provided by a third party Broadband Internet Providers.
OXLEY-WRIGHT – Internet access
Internet is provided by BT SuperFast Broadband (max 76Mb/s, average 50Mb/s) which provides wireless and wired connection for all rooms in the house. When you first arrive in the accommodation the wireless password should be available from the VP. The rooms are also enabled for wired Ethernet connection.
Wired Ethernet may be more stable than wireless due to the size of the house. To use a wired connection, you will need an Ethernet adapter and an Ethernet cable. Both can be purchased online from numerous online shopping sites. We use ANKER Ethernet adapters in College and found that they work with Microsoft Windows and Apple macOS without the need to install separate drivers. Amazon.co.uk : ANKER ethernet adapter
You will also need an Ethernet cable, do not purchase one which is too long – otherwise you end up tripping over it, three to five metres in length should be fine; if you need a longer cable then contact the College IT Office and we can make a cable to the required length.
Be aware that the Internet connection is shared with everyone in the house; if you experience any slow down in network speed it will most probably be one of your neighbours downloading a large file or streaming. Please therefore be considerate with your downloads. If the Internet goes down for the whole house then please contact the College IT Office.
VENNEIT CLOSE – Internet access
- Got a problem with the Internet connection?
- Reset Router to factory defaults
- Router has all Green Lights but still no Internet access
or Internet Light is Red - How to change the WIFI channel on the Huawei HG635 super router
Internet is provided by TalkTalk Business Fibre Broadband (max 50Mb/s, average 30Mb/s) and each flat has its own wireless Router. When you first arrive in your Venneit Close flat you will find a Broadband Router connected to the Master Telephone Socket; this may be in the sitting room, kitchen or one of the bedrooms. The Router should have all Green lights lit – if it doesn’t then see Internet connections issues below. The Wireless network name and wireless password are printed on the back of the Router.
Got a problem with the Internet connection?
As Internet connection is provided by a commercial third-party (TalkTalk) it can be challenging for the IT Office in College to support residents. Also College IT staff are not on-site at Venneit Close to troubleshoot issues, so we are therefore reliant on the residents to provide details of any issues.
Therefore, in order for us to help you we need the following information when there are Internet connection issues at Venneit Close.
- Please send us four photographs of the following:
- Router status lights – Power/Wireless/Broadband/Internet should all be GREEN. NB – The Ethernet light will only illuminate if you have connected a device with an Ethernet cable.
- Wireless network information panel on the back of the Router eg reads something like “TALKTALK-9BKD872”
- The back of the Router so we can see how wires are connected.
- Finally, a photo of the actual telephone wall socket to which the Router is connected. (For instance, some types of wall socket require a micro-filter adapter)
- Are there any other telephone handsets connected to any other telephone wall sockets in the flat (please check all bedrooms)
- Do you currently have Internet Access – ie can your computer view websites and you can send/receive emails
- If you can currently access the Internet:
- What download and upload speeds are you experiencing?
- TalkTalk can see speed tests results run on http://internet-speedtest.net so using this site helps us get the support you need.
- Please provide speed test results for various times of the day – ideally morning, daytime, evening. It is normal that the internet speed will be slower at popular / busy times of the day – for example in the evenings when other broadband users may be streaming video content like Netflix or Amazon.
- What download and upload speeds are you experiencing?
- If you cannot currently access the Internet, then please reset your Router to factory defaults and see if this resolves your issues. The Router should pick up the Internet Provider’s configuration automatically.
- Once we have the above photographs and information, we can then go back to the Internet Provider and try and get the issue resolved.
Reset Router to factory defaults
To restore your Router to its factory settings, follow these steps:
- Switch your router on, if it isn’t already
- Locate the reset pinhole button. This is usually on the back or side of your router
- Gently push a pin, a straightened paperclip or another appropriate item into the hole until you feel a click. Hold it for 30 seconds
- The lights on the front of the router should turn off and come back on again, starting with the power light
- Once your router has fully booted and all the lights are green, you can reconnect your devices to your Wi-Fi
- If the power light goes red and stays red for more than two minutes, then your router may be faulty.
Router has all Green Lights but still no Internet access or Internet light is Red
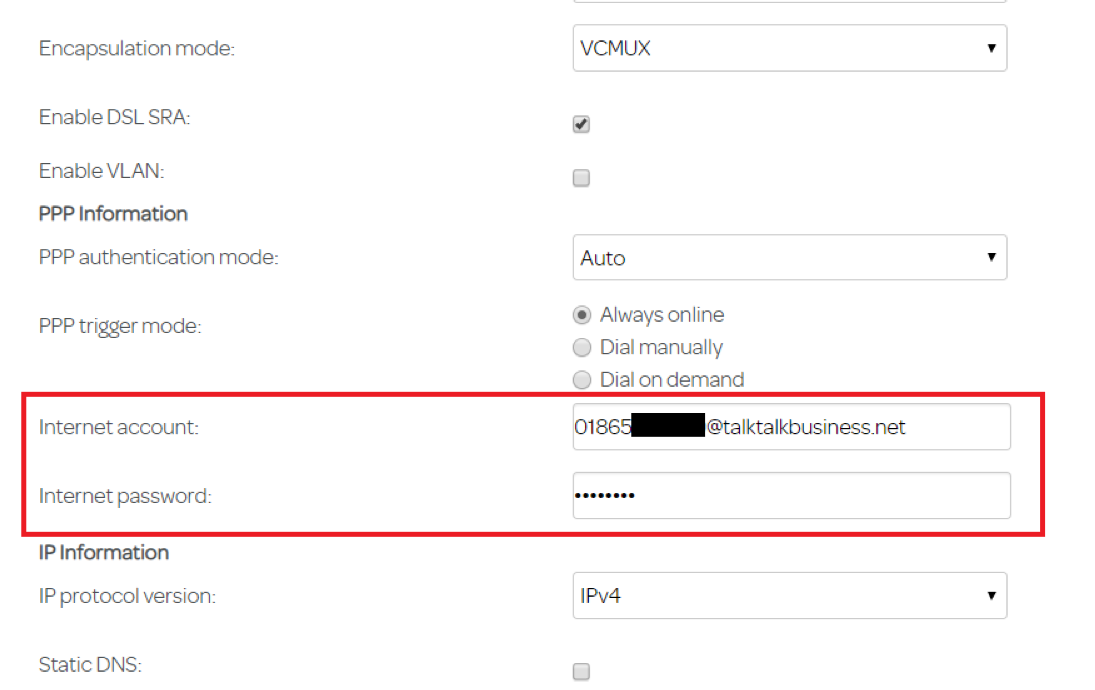
The Router should pick up its configuration automatically via the telephone line, however, there are times when this doesn’t happen. In these cases, the Internet account and Internet password need to be entered manually. We are not given these login credentials automatically from the Provider; we must request them after various security checks. If you believe you may need the Internet account and password, then please contact the IT Office and we shall attempt to obtain them.
Below are a couple of screenshots to show where to enter the Internet account and Internet password once obtained.
- Open a Web Browser and enter the following in the address bar:
http://192.168.1.1
- You will be prompted for the Default Router Settings login credentials – this is written on the back of the Router (default is admin)
- Then Click on the Internet tab and then Internet Connection
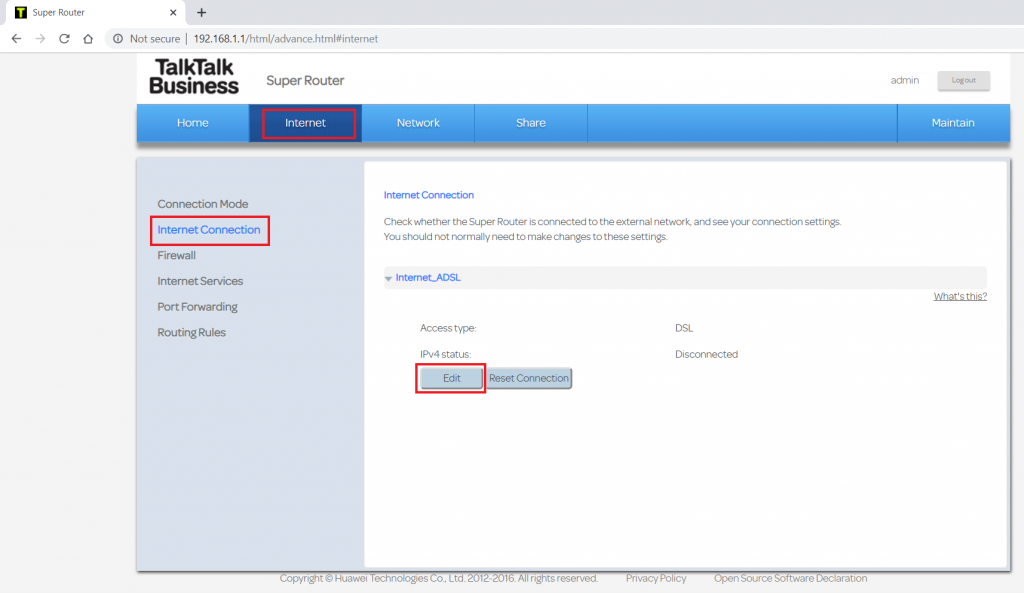
- Once you click the Edit button, just scroll down to the Internet account and Internet password fields.


How to change the WIFI channel on the Huawei HG635 super router
Wireless routers publish their connection on one of several Channels – between 1 and 11. These channels can overlap neighbouring Wireless signals and therefore can cause interference and poor wireless connection. It can be useful sometimes to change your Router’s Channel so that it doesn’t interfere with neighbouring properties.
If you are having issues with a “flaky” wireless connection then you may want to look at changing the WIFI Channel – we suggest sticking to either 1, 6 or 11, as the other channels overlap each other and will cause interference. It is worth knowing that if you change the channel and the reboot or reset the router, then the channel may need to be reset as well.
- Open an internet browser
- In address bar, type:
- http://192.168.1.1
- Log in using:
- Username: admin
- Password: admin (this is the default password)
- Select “Home Network” from the menu bar at the top
- Next choose “Wireless Settings” on the left-hand side of the menu
- Open “Advance Settings”
- Under 2.4GHz Frequency Band, select the drop down next to the channel
- Select a channel (best choices are 1, 6 or 11)
- Finally click Save at the bottom of the page